
Applicant resubmit task
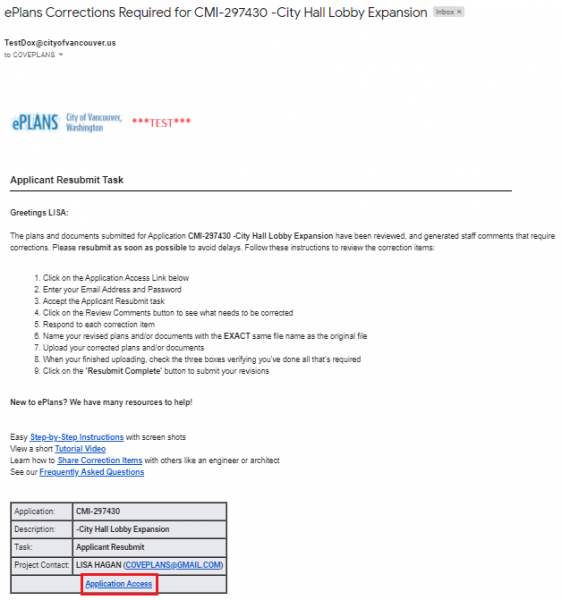
If corrections are requested following the review of your application, you will receive an email notification. This means revised plans and/or documents as well as a response to the plan review comments are requested. This task is called the Applicant Resubmit Task.
Step 1: Click on the ‘Application Access’ link in the email invitation.
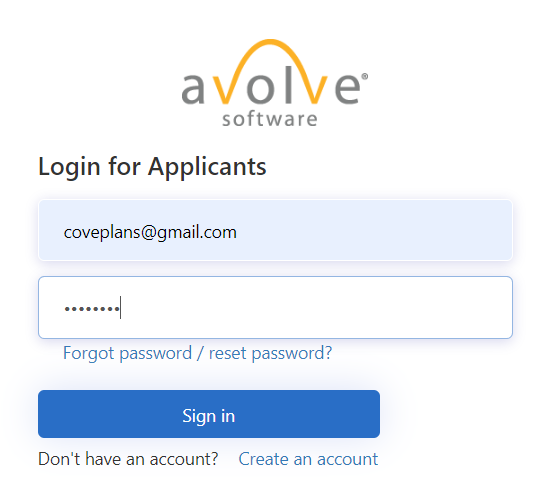
Step 2: This takes you to the ePlans Login screen. Enter your email address and password and click ‘Sign in’.
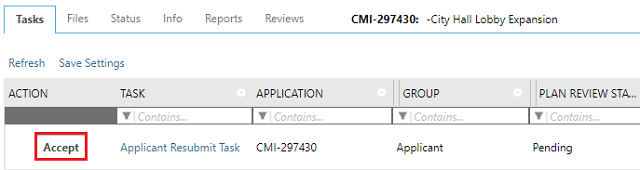
Step 3: Click on the ‘Accept’ button next to the ‘Applicant Resubmit Task’ in the Tasks tab.
Viewing Correction Items on Plans and Documents
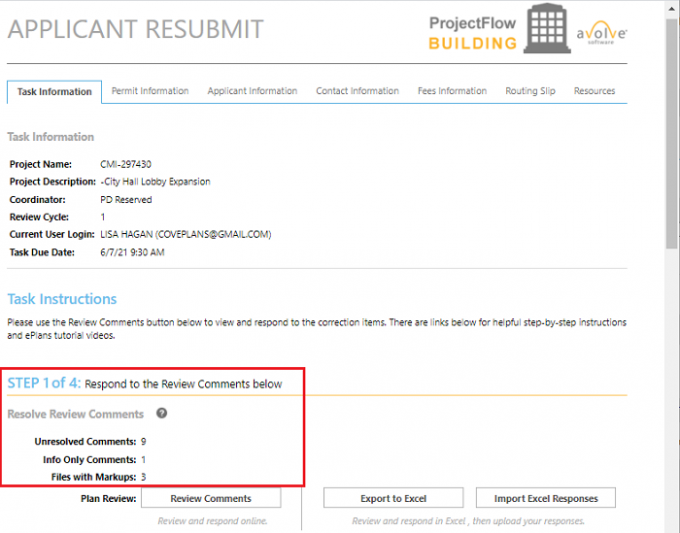
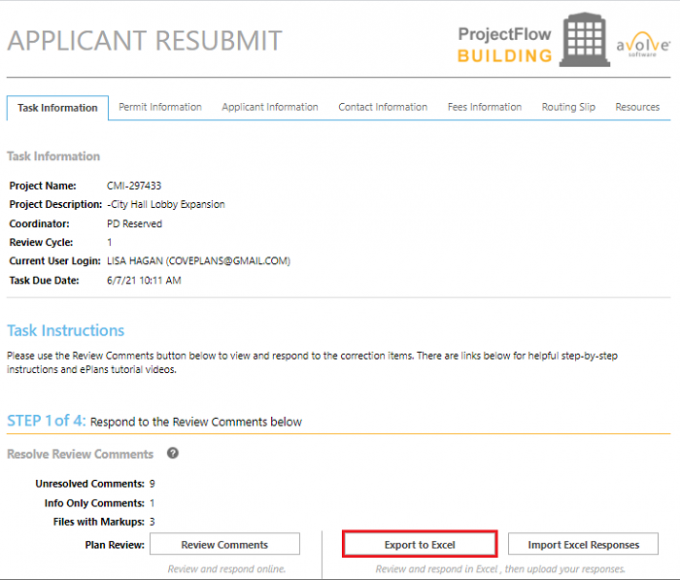
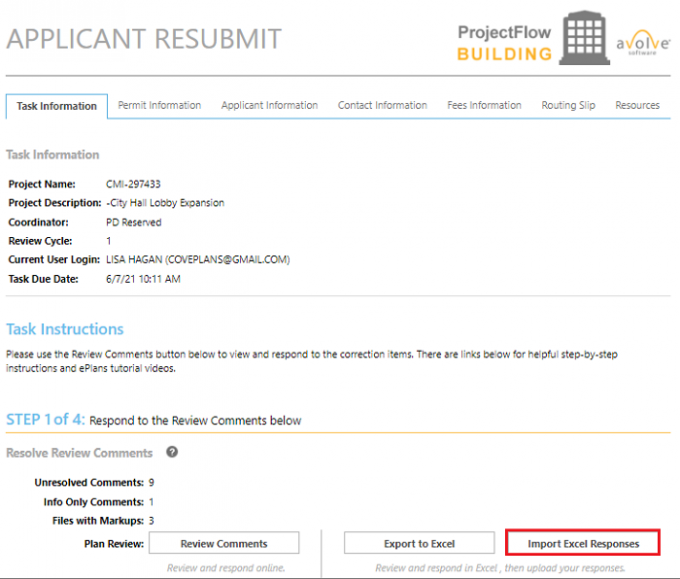
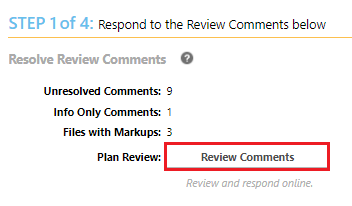
With the Applicant Resubmit Task open, you’ll see under Step 1 of 4 a tally showing you how many unresolved comments, info only comments and files with markups there are.
There are a few different ways you can view and respond to the correction items. These are all outlined below. You can use one or all of these methods to view and respond to the correction items so please use which ever method or methods work best for you.
A response is required for all unresolved items. Anything you type in the response column using any of the methods below will automatically be saved!
Review Comments Button
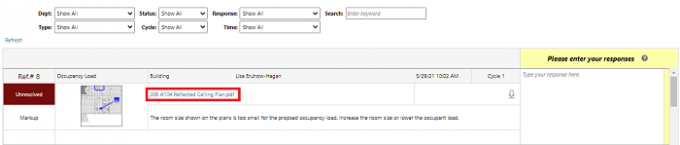
The first way to view and respond to your correction items is to click on the Review Comments button located in the task. This opens the review comments in a grid view where you can scroll up and down to view and respond to them. You can use the drop down menus at the top of the screen to filter the list and to search. This can be very helpful if you only want to view a certain departments corrections, or look at only the unresolved items, etc.
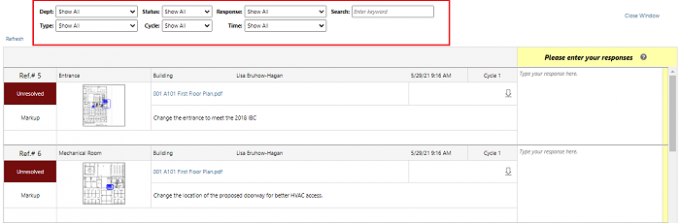
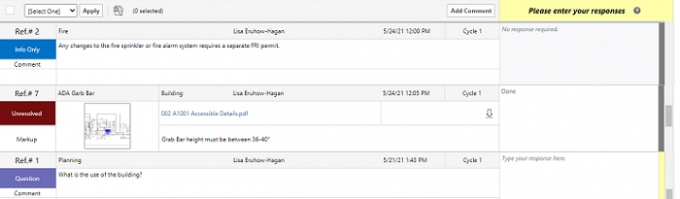
Below is an example of what the corrections could look like. There are four categories that you could possibly see:
Info Only: This is information the reviewer wanted you to have that they think will benefit you. No applicant response or change is needed in your submittal. It’s for informational use only.
Unresolved: This means that a correction/change needs to be made. It will show the file the change needs to be made on and what they are asking you to correct. It does require that a revised file is uploaded and an applicant response is entered to the right.
Resolved: This means this correction/change that was previously requested was made and has been resolved by the reviewer. As you progress through the review process, you’ll start to see your Unresolved items turn Resolved. No change is needed and no response is required.
Question: This is when a reviewer has a question about your submittal. No correction needs to be made on a file but you do need to respond and provide an answer to the question to the right.
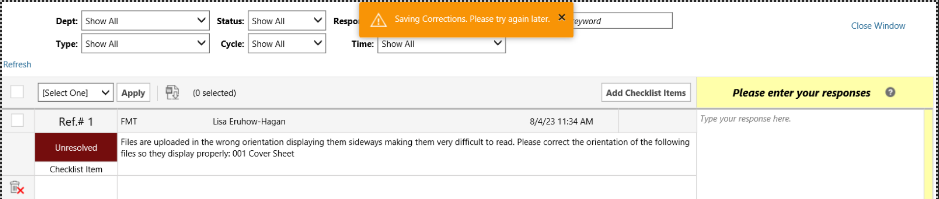
If you receive an error message saying ‘Saving Corrections. Please try again later.’ simply click anywhere outside that field and then you can close the window and it will save everything you typed.
What does the information mean?
- The Reference #: This gives you a unique number for each correction item. This is used to communicate with the reviewers in case you have any questions about that correction item. You can email or call the reviewers and say “Reference #6” since they see the same information you do. This way they know exactly what correction you’re referring to.
- Markup Name: This is the name of the correction item.
- Department: This shows you the name of the department that the correction came from.
- Reviewer Name: This is the name of the reviewer who added the item on your submittal.
- Markup Date: This is the date and time that correction was placed on your submittal.
- Cycle #: This tells you what review cycle that correction item was placed on your file.
- Category: This tells you what type of markup it is. Please see the description above for the four available categories and what each one means.
- Snapshot: This gives a thumbnail image of where the correction is on your file. You can click on it for an enlarged view of that correction on the file.
- File Name: Click on this hyperlink and it will open a full size view of that file with the markup on it.
- Markup Details: This is what needs to change or be corrected.
- Download Arrow: This is a one step click to download the file with the markup on it as a pdf. This pdf can be saved on you computer, emailed to third parities or saved on your computer.
Reviews Tab
The second way to view and respond to your correction items is the permit in ePlans. With the permit open in ePlans you’ll see the Reviews tab as shown below.
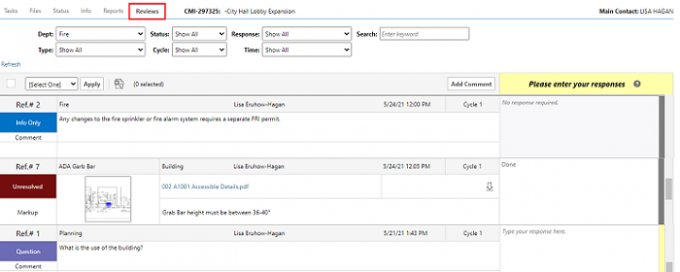
This is displays the same information you’d see as when you are in the Applicant Resubmit Task and clicked on the Review Comments button. It operates the same with the drop down lists and search options at the top of the screen. There is the response column to the right which will auto save anything you type in it.
If you receive an error message saying ‘Saving Corrections. Please try again later.’ simply click anywhere outside that field and then you can close the window and it will save everything you typed.
ePlans Tip:
Did you know you can send changemarks to another person? Please see Sharing Correction Items for more information. You can send all the changemarks or individual plan pages with the changemarks on them.
Opening the Markups on the File for a Full Screen View
The third way to view and respond to your correction items is a full screen view of the file with the markups on it. To start, you want to be at the Review Comments or the Reviews tab as shown above. Next, you click on the file name which is shown in the center of the screen as a hyperlink.
This opens the file with the markups on it. This is the most visual way to view and respond to the correction items. You’ll see a response area to the right so be sure and type in a response and click ‘Save Response’.
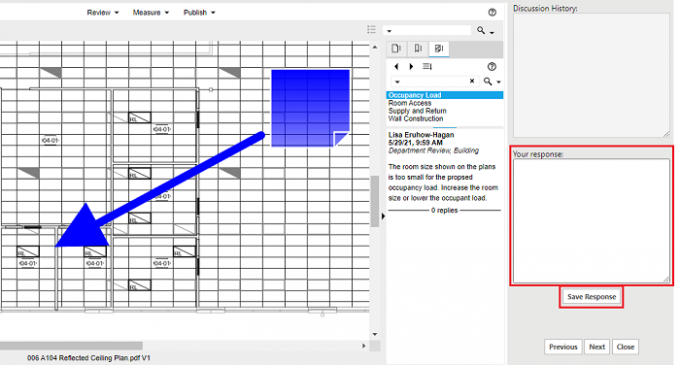
It will give you a confirmation message that the response has been saved.

It will then progress to the next correction item in your submittal. It will continue to do this each time you save a response. You can also use the Previous and Next buttons at the bottom to navigate through the correction items.
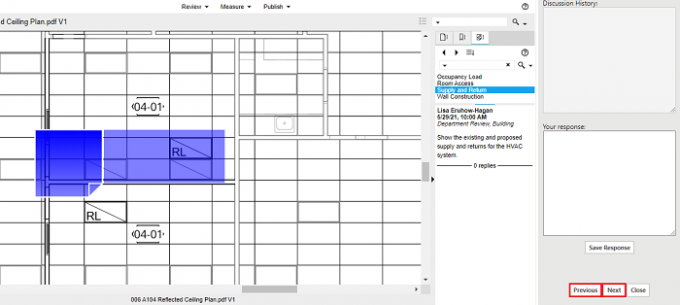
This is a very visual way to go through the all the correction items on your permit, one by one, department by department, file by file.
Exporting/Importing from Excel
The fourth way to view and respond to your correction items is by exporting the correction items to excel. You can add a response and then import those responses from excel into ePlans. This reduces the need for copying and pasting or retyping a response. With the Applicant Resubmit Task open, go to Step 1 of 4 and click on the Export to Excel button.
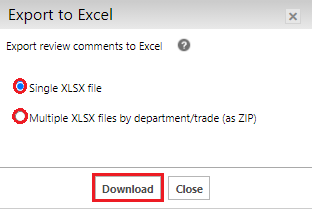
A window opens where you select to export the markups all in one excel file or multiple excel files based on department. Having multiple excel files based on the department might be helpful if you want to send the corrections just from building or fire to a different person. Once you select the option you want, click Download.
This opens an excel file of all the markups on your submittal. It shows the same information you were viewing in ePlans, like the reference number, department name, name of the reviewer, markup title, cycle number, markup details, etc. It will also show you can response you might already have entered in ePlans. This spreadsheet can be saved on your computer, emailed to third parties or printed.

It is a protected spreadsheet so you can only enter an applicant response and you are not able to move or edit any other columns or rows. The goal is that you or a third party can review and respond to each correction item. You can save the excel spreadsheet with your own file name. This would be helpful if your going to be getting responses from multiple people.
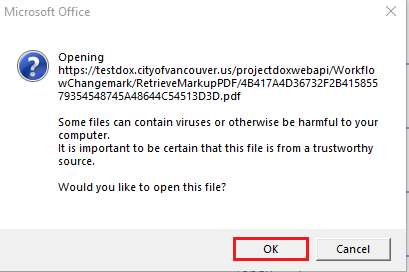
In the view column, you can click on the open link to open the file in a full screen view with the markups on it. When you click on open, it will ask if you want to open the file. Click OK.
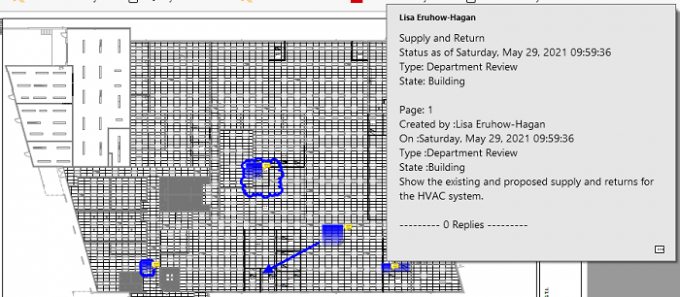
Now it will open this file with the markups on it. You can hover over each markup to view the content. You do not need to be the electronic plan submitter to use this feature so it’s perfect for sharing the correction items with a third party like your architect or engineer.
You can enter all the responses or only some of them in the spreadsheet. A third party can enter applicant responses and send it back to you as the electronic plan submitter or you can enter them yourself. When your ready to import any responses, login to ePlans and open the Applicant Resubmit Task. Click on the Import Excel Responses button.
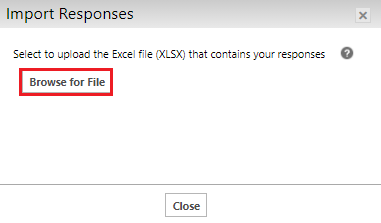
A new window opens where you click Browse for Files.
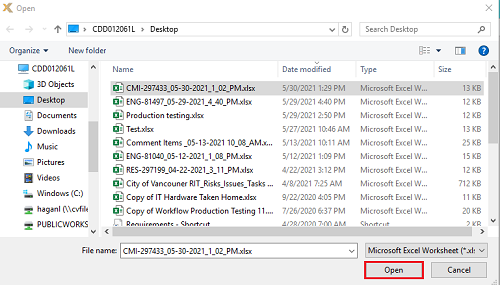
Next, select the excel file that has the applicant responses entered in it and click Open.
ePlans now imports the applicant responses from the excel file you selected. It will show you a total of what it imported. Any applicant response from the excel spreadsheet will replace an existing response in ePlans.

You can continue to import more responses by clicking on Import Multiple and selecting another excel file or click Close.
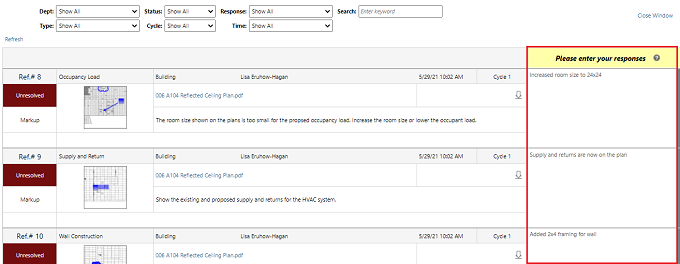
When you select Close. You can click on the Review Comments button and see that the applicant responses have been saved in ePlans:
These are the four different ways you can view and respond to the correction items in ePlans.
If you do not agree with a correction item, please contact that reviewer directly via email or phone to resolve it before you resubmit your revisions.
Uploading Revisions
Scroll down in the Applicant Resubmit task and under Step 2 of 4, click on the appropriate tab to select Versioned Files or New Files to upload your files.
Use the Versioned Files tab if you are uploading a new file that is replacing an existing file in ePlans. Use the New Files tab if you are adding a plan page or document to your submittal that was not previously uploaded to ePlans.
ePlans Tip:
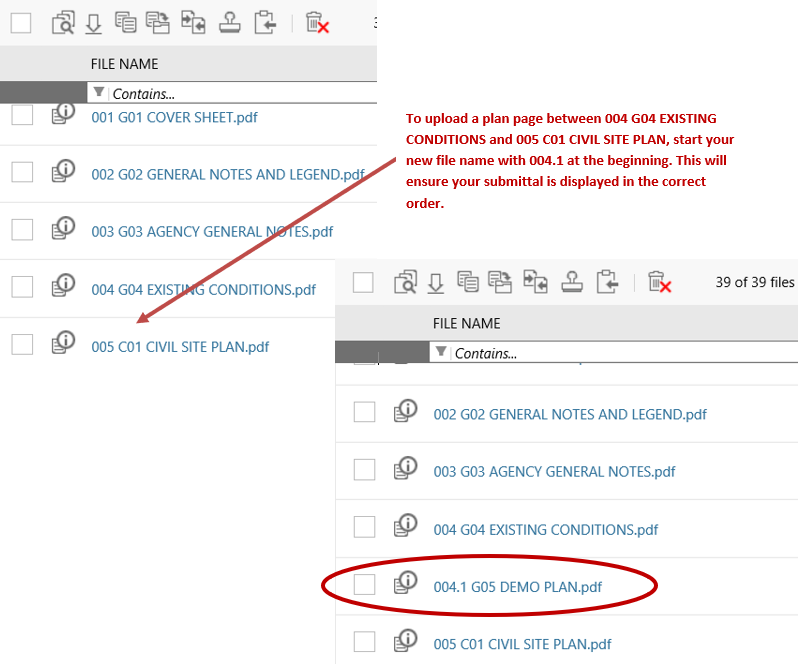
If you need to insert a plan page between two existing pages, please see our File Naming Standards page.
Versioned Files
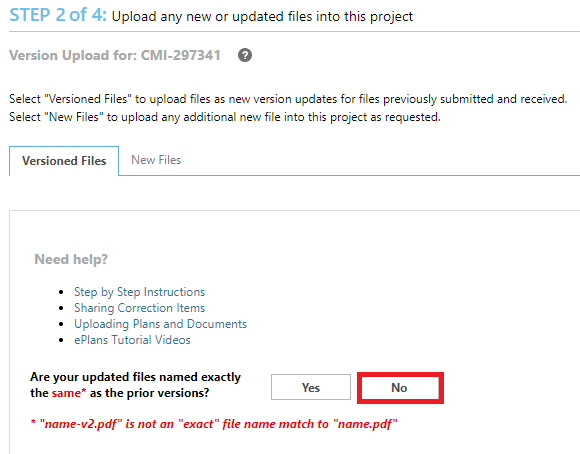
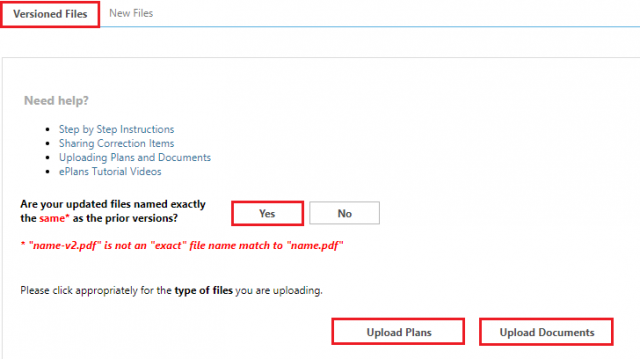
If you select the Versioned Files tab, it will ask if your new files are named the exact same as the original file.
If you select Yes, ePlans will not change your file names and you’ll have the option to Upload Plans or Upload Documents. Please see the section under the New Files Tab for those instructions.
If you select No, ePlans will automatically rename your new file with the same as the existing one. These steps are outline below.
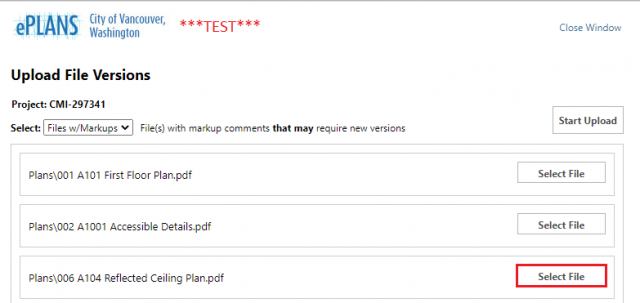
Upload File Versions: A window will open that displays all the files that have markups on them. Choose the file you want to replace and click on the ‘Select File’ button.
Select the File: Select the new file from your computer. Click the ‘Open’ button.

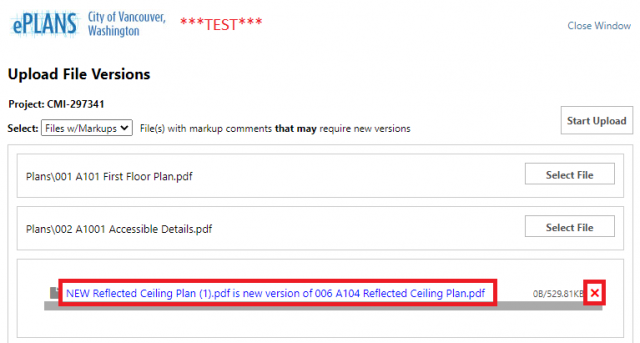
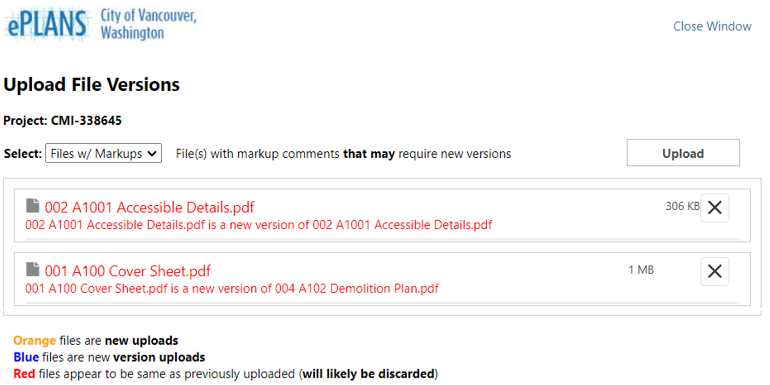
Reviewing/Deleting Files. The window will now show you the name of the new file that you selected and the name of the file it will replace. Since the new file name does not need to match the existing file name, it’s very important that you verify you have the correct file selected. If you do not, click on the red ‘X’ to the right to remove the file you selected and repeat the steps above to select the correct file. This is your one opportunity to remove an incorrect file before you upload it to ePlans.
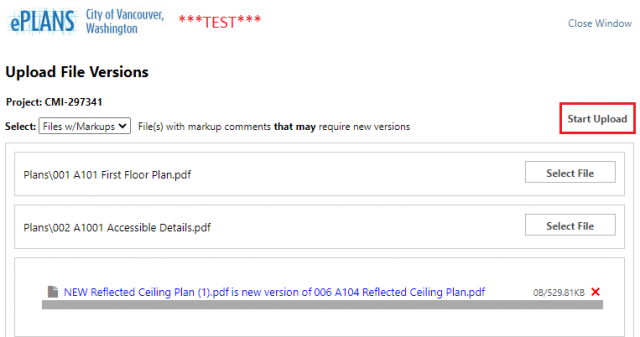
Start Upload: Once you’ve verified you have the correct file selected to replace the existing file, click on the ‘Start Upload’ button.
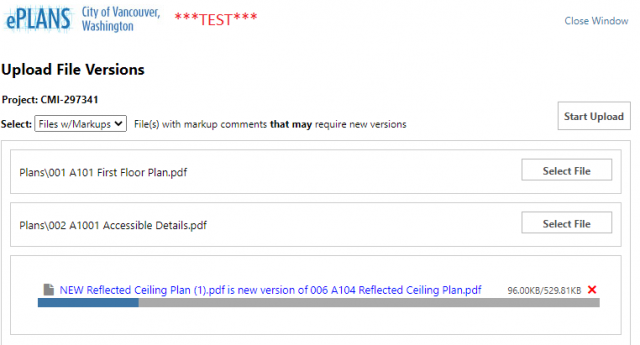
You’ll see the status bar update as it uploads the file:
When using the versioned file upload, all the file names will all appear red in the upload window. This is a flaw in the software and will be repaired shortly. Temporarily, please ignore the file name color and click on the ‘Start Upload’ button. The files will upload properly.
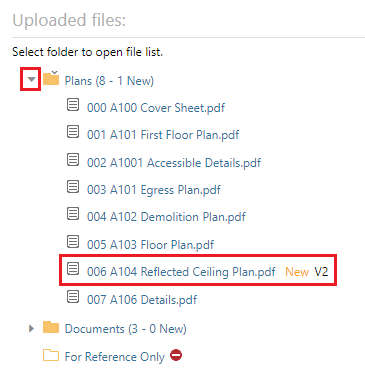
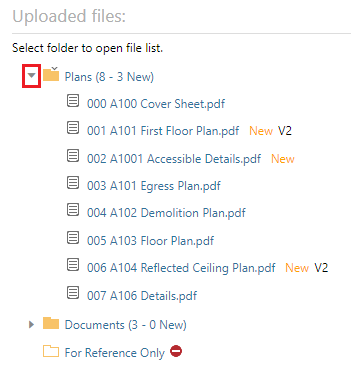
Viewing Files: Scroll down and under Uploaded Files, you can view the files that are uploaded to the folder you selected by clicking on the expand button. ePlans will automatically rename the new file you selected with the same name as the existing file so it creates a new version of that file in ePlans.
Behind the file name you’ll see New in orange and a V# letting you know it’s a new version of the existing file.
You can scroll up and continue to use the No under the Versioned Files tab to upload more versioned files as many times as necessary until your submittal is complete. Please see the instructions below on how to upload new files or our webpage on the Applicant Resubmit Task for more information.
New Files
If you are on the Versioned Files tab and select Yes or if you clicked on the New Files tab, you will see an Upload Plans and an Upload Documents button.
Select Plans or Documents: Click on the appropriate button to Upload Plans or to Upload Documents. Below are the two options you may see:
Or

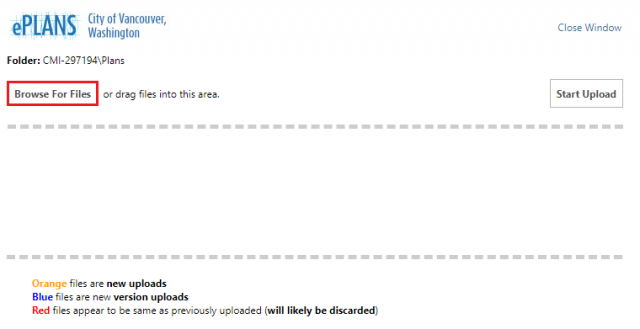
Browse for Files: Click on the ‘Browse For Files’ button to select the files you want to upload. You can also drag and drop files into this window for upload.
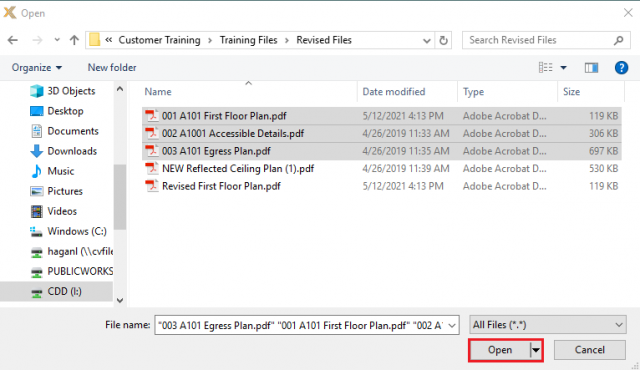
Select the Files: Select the files to upload from your computer. Multiple files can be selected by using your Shift or Ctrl keys. Click the ‘Open’ button shown in the image below to select those files to upload.
Reviewing/Deleting Files: The window will now show you the files you selected.
A file name in Orange means that is a new file that is not currently uploaded to ePlans. This will be correct if you are adding an additional page into an existing plan set. It will not be correct if this should be replacing an existing file. It would mean the new file name does not match the existing file name.
A file name in Blue is a new version of an existing file. If you are uploading multiple revised files at once, all the file names should be blue since the new file names should match the existing files in ePlans.
A file name in Red means that ePlans has compared the new file you selected to upload with the existing file in ePlans with the same name and the two files are identical. Since no change was made to the file, ePlans will not upload it.
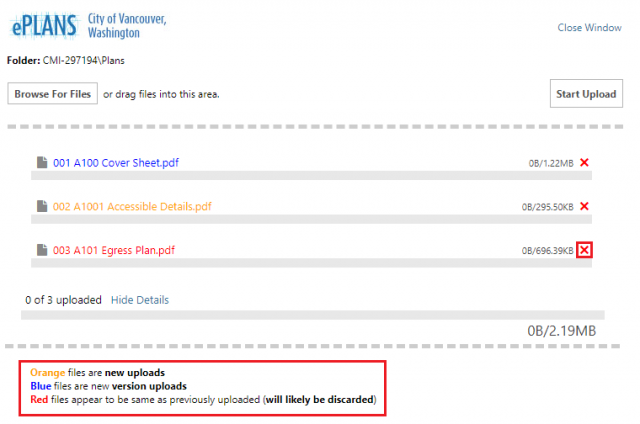
You can click on the X to the right to remove any files you selected. This is your one opportunity to remove a file so be sure and scroll up and down and verify you have the correct files selected and remove any you don’t want uploaded.
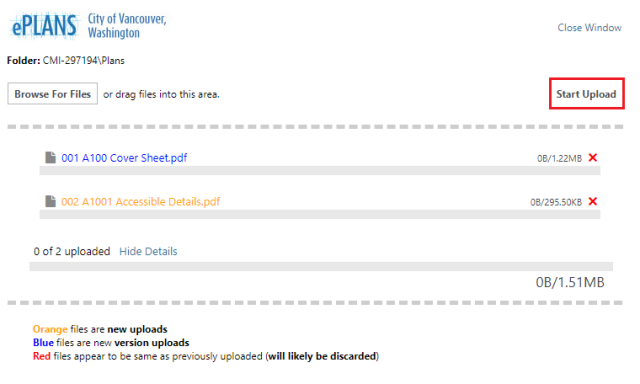
Start Upload: Once you’ve verified you have the correct files, click on the ‘Start Upload’ button.
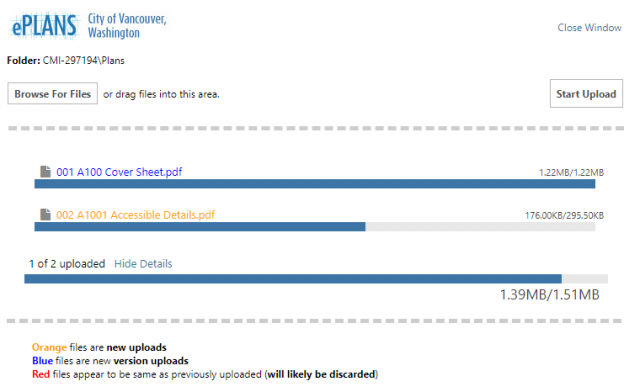
You’ll see the status bar update as it uploads the file:
Viewing Files: Scroll down and under Uploaded Files, you can view the files that are uploaded to the folder you selected by clicking on the expand button. Behind the file name you’ll see New in orange and a V# if it’s a new version of an existing file.
Inserting a new plan page between two existing plan pages in your submittal
Please use the example below on how to correctly name a new page so it inserts at the correct spot in your existing submittal.
Signing off your Task
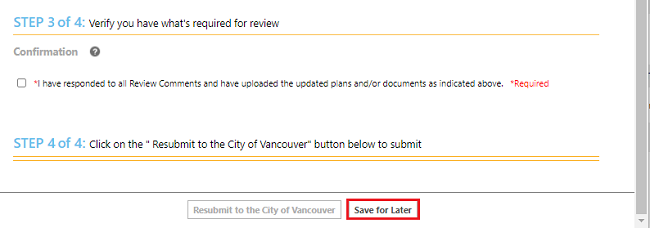
Save for Later: Selecting this button will not send your application back to the City for review, but it will be saved so you can finish it later.
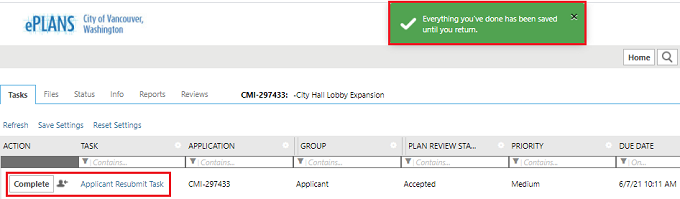
A message comes up confirming everything’s been saved. The task stays active and with you as the applicant so you can continue to come back as many times as necessary to respond to the review comments and upload revised files until it is complete.
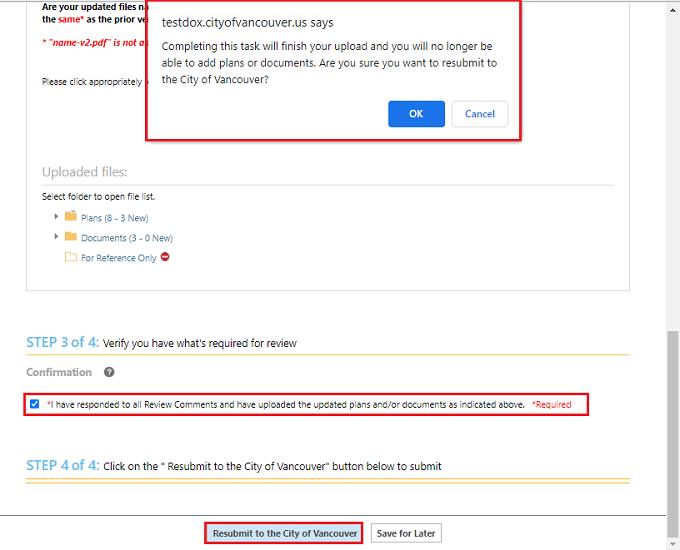
Resubmit to the City of Vancouver: Selecting this button will complete your task and you will no longer be able to upload files or respond to the review comments.
When you are finished, scroll down to Step 3 of 4 and check the box indicating that you have responded to all the review comments and have loaded the corrected plans and/or documents.
Click on the ‘Resubmit to the City of Vancouver’ button.
One of two messages will possibly display. The first will be green in color and comes up confirming we’ve received your upload.
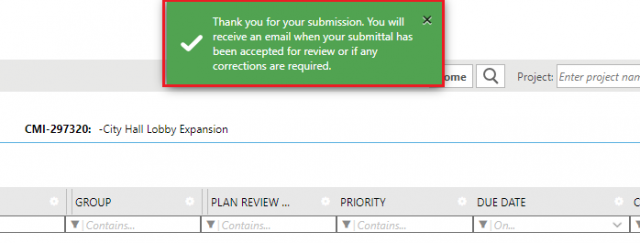
The Applicant Resubmit Task will not longer show in the Tasks tab on your permit application because it has been completed and sent to the City for review.
The second will be orange and says we are missing an applicant response to an unresolved review comment.
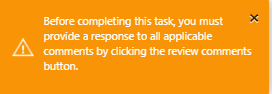
If you receive this message, scroll up and under Step 1 of 4, click on the Review Comments button.
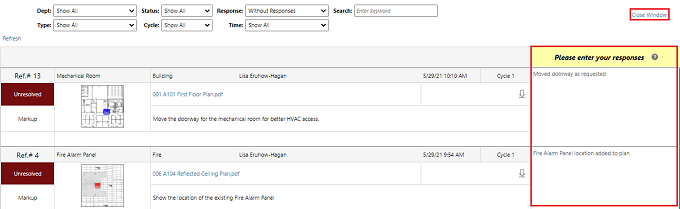
Next, use the Response drop down list and select ‘Without Response’

This will show you only the unresolved items that do not have a response. Enter a response and click Close Window.
Now you can click on the ‘Resubmit to the City of Vancouver’ button at the bottom of the screen and you should receive the green pop-up message that the submittal has been sent to the City of Vancouver as shown above.
Please note that if you have not clicked on the ‘Resubmit to the City of Vancouver’ button, the City has not received your submittal and after 10 business days, ePlans will start sending you reminders that it has not been submitted every three business days for a maximum of five times.
If you have any questions, please contact us so we can help.